
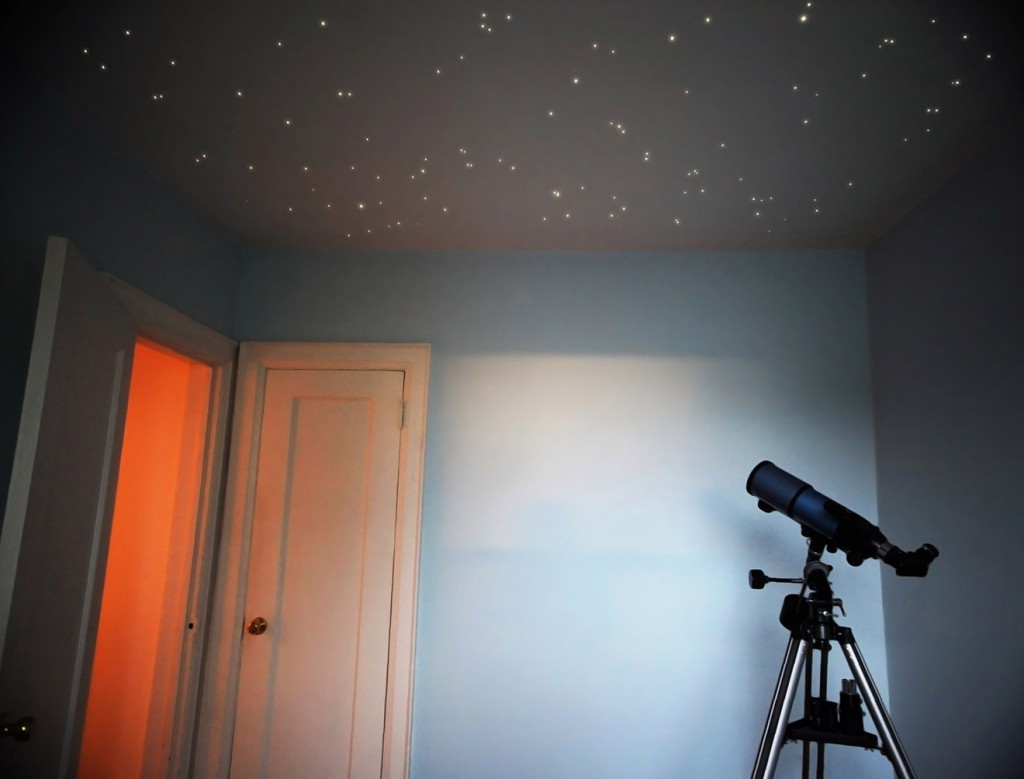


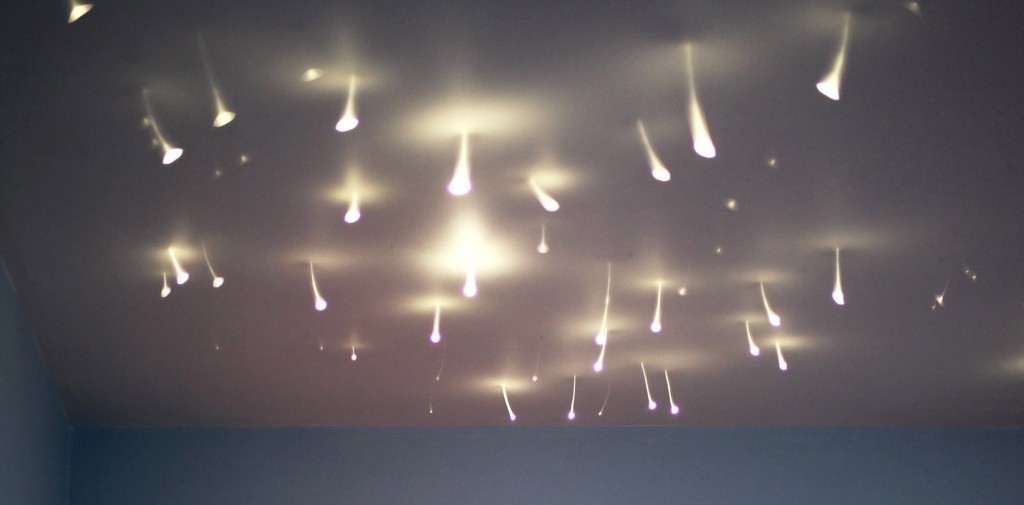
Getting a house ready for a new baby is no small task, there’s really no end to what one may consider essential, such as a fiber optic star-filled ceiling for the nursery. There’s nothing more comforting to an infant than the feeling that they’ve been left in the woods under a wondrous, awe inspiring, night sky — no?
Thankfully there are some great products available to convey just that feeling with the use of fiber optic cabling. Wiedamark offers a number of kits as well as the separate components, which are basically bunches of fiber optic cabling and a light source or illuminator. I opted for their 288 3 Star LED Fiber Optic Star Ceiling Kit With New Dimming Feature, it comes with everything you need for a drywall install (aside from tools) and includes 3 different diameters of fiber optic cables which translate to different sized stars or planets.
While waiting for the kit to arrive my wife and I decided on a night sky to represent. Our first child is due in December so we chose the night of the Winter Solstice this year, December 21st, 2014, or at least what the night sky should look like barring some unforeseen astronomical event. There’s some handy sites online you can use to generate a star map on which you can base the ceiling. We used Your Sky which generates images based on date, location and a number of useful options. The easiest way to get your latitude and longitude if you don’t already have it is to find your home on Google Maps and grab your lat/long from the address bar, it will look something like this 43.650033,-79.391594. Positive latitudes, the first number, are North and negative are South. Positive longitudes, the second number, are East and negative are West. So when using the above coordinates in the Your Sky interface it would be 43.650033 North by 79.391594 West. You can also turn on and off constellation names and such as well as select what magnitude of objects to display. For printing purposes it’s useful to change the output to Black on white background, if you’re printing in colour this may not be the case. It’s also useful to increase the image size, something around 2400 x 2400 should do.
Once you have a sky that you’re happy with you can right click on the resulting image and select save image in your browser, you’ll end up with an image aptly entitled Yoursky.gif. I decided to divide the image into a grid in order to make it easier to transfer the star positions to the ceiling. This step is completely optional as you can just wing it if you like, create your own constellations and such, though you run the risk of creating an awkward cluster of stars that you’ll end up focused on for years to come.

I won’t go too far in-depth with the install instructions as I’ve recently found another fellow has here, in addition, Wiedamark has a variety of instructions available here. I will, however, outline some of the differences in my approach. You should note I placed the light in my attic, this requires an electrical outlet in the attic, you can also place the light source in a closet or the corner of a room. I also placed the light source in a large plastic storage bin with holes for the power and fiber optic cables to isolate it from the blown insulation in my attic. The light source does need ventilation so ensure any container is large enough for ample airflow and is not sealed.
Two things made my install quite a bit more difficult than a typical install, the first is that the target ceiling, and most of our house, is plaster lath and the second is that our attic has about 3 feet of blown insulation piled on top the 2nd floor ceilings. Step one should have been to clear away the insulation from the ceiling, I was impatient and only did this after I drilled many of the holes and promptly regretted it. Clear the insulation first, everything will go much faster. If you don’t have much space in your attic some good knee pads will go a long way to avoiding aches and pains, you’ll be up there for a while.
The typical method of install for these star fields is to drill through drywall from above and feed the fiber optics down through the drilled hole. Those of you familiar with plaster lath may see a problem with this method — plaster lath enjoys cracking off in large chunks, especially if you’re drilling through from the unfinished side. Because of this I decided to drill up through the ceiling, which reduces the plaster cracking, and insert a placeholder wire into each hole which I could then locate from the attic in order to replace with a fiber optic cable. For the kit I selected I needed three different colours of wire, one for each size of cable/star. I chopped this wire into lengths of 4 or 5 inches, one length of wire for each star. When transferring the star map to the ceiling be mindful of your cardinal directions and take some time to ensure that you’re orienting the map correctly, or not, it doesn’t matter all that much in the grand scheme of things — then again, maybe it is the grand scheme of things!
If you’re dealing with drywall you can skip this entire step, if you’re taking my approach you’ll end up with something like this after drilling and inserting placeholders.
Try to match both the drill bit size and the wire to the fiber optic cable diameter as closely as possible, this will contribute to a clean finished install. I found it difficult to find drill bits small enough, but they are out there.
The next step is to head up to the attic and feed fiber optic cable down through each hole, drilling down if you have drywall and replacing the placeholders if you have plaster lath and have already drilled from below. An LED headlamp helps quite a bit if you don’t have lighting in your attic. The hardest part (aside from back aches and sore knees) is keeping the fiber optic bundles organized, fiber optic cable will craze or crack if bent and that will impede or interrupt the light flow through that cable, so be gentle. It seems easy to pull cables off at first, but eventually everything will be a tangled mess if you don’t take your time to stay organized from the beginning. It helps to first separate the different sized cables into their own bundles. Be sure to push each cable at least a couple inches further than you need through the holes, you’ll clip them flush only after you’ve patched and painted any ceiling defects resulting from the install. Once you’ve placed a star and are sure it’s extended down through the ceiling by a couple of inches then put a dab of glue where it enters the ceiling from above to keep it in place. Use a glue thick enough so that it doesn’t drip through any extra space or along the cable.
This is the most time consuming, frustrating and potentially painful part of the process and is best done in stages. On the upside I bet you never thought you’d find yourself grappling for hours on end with a nightmarish deep sea monster.
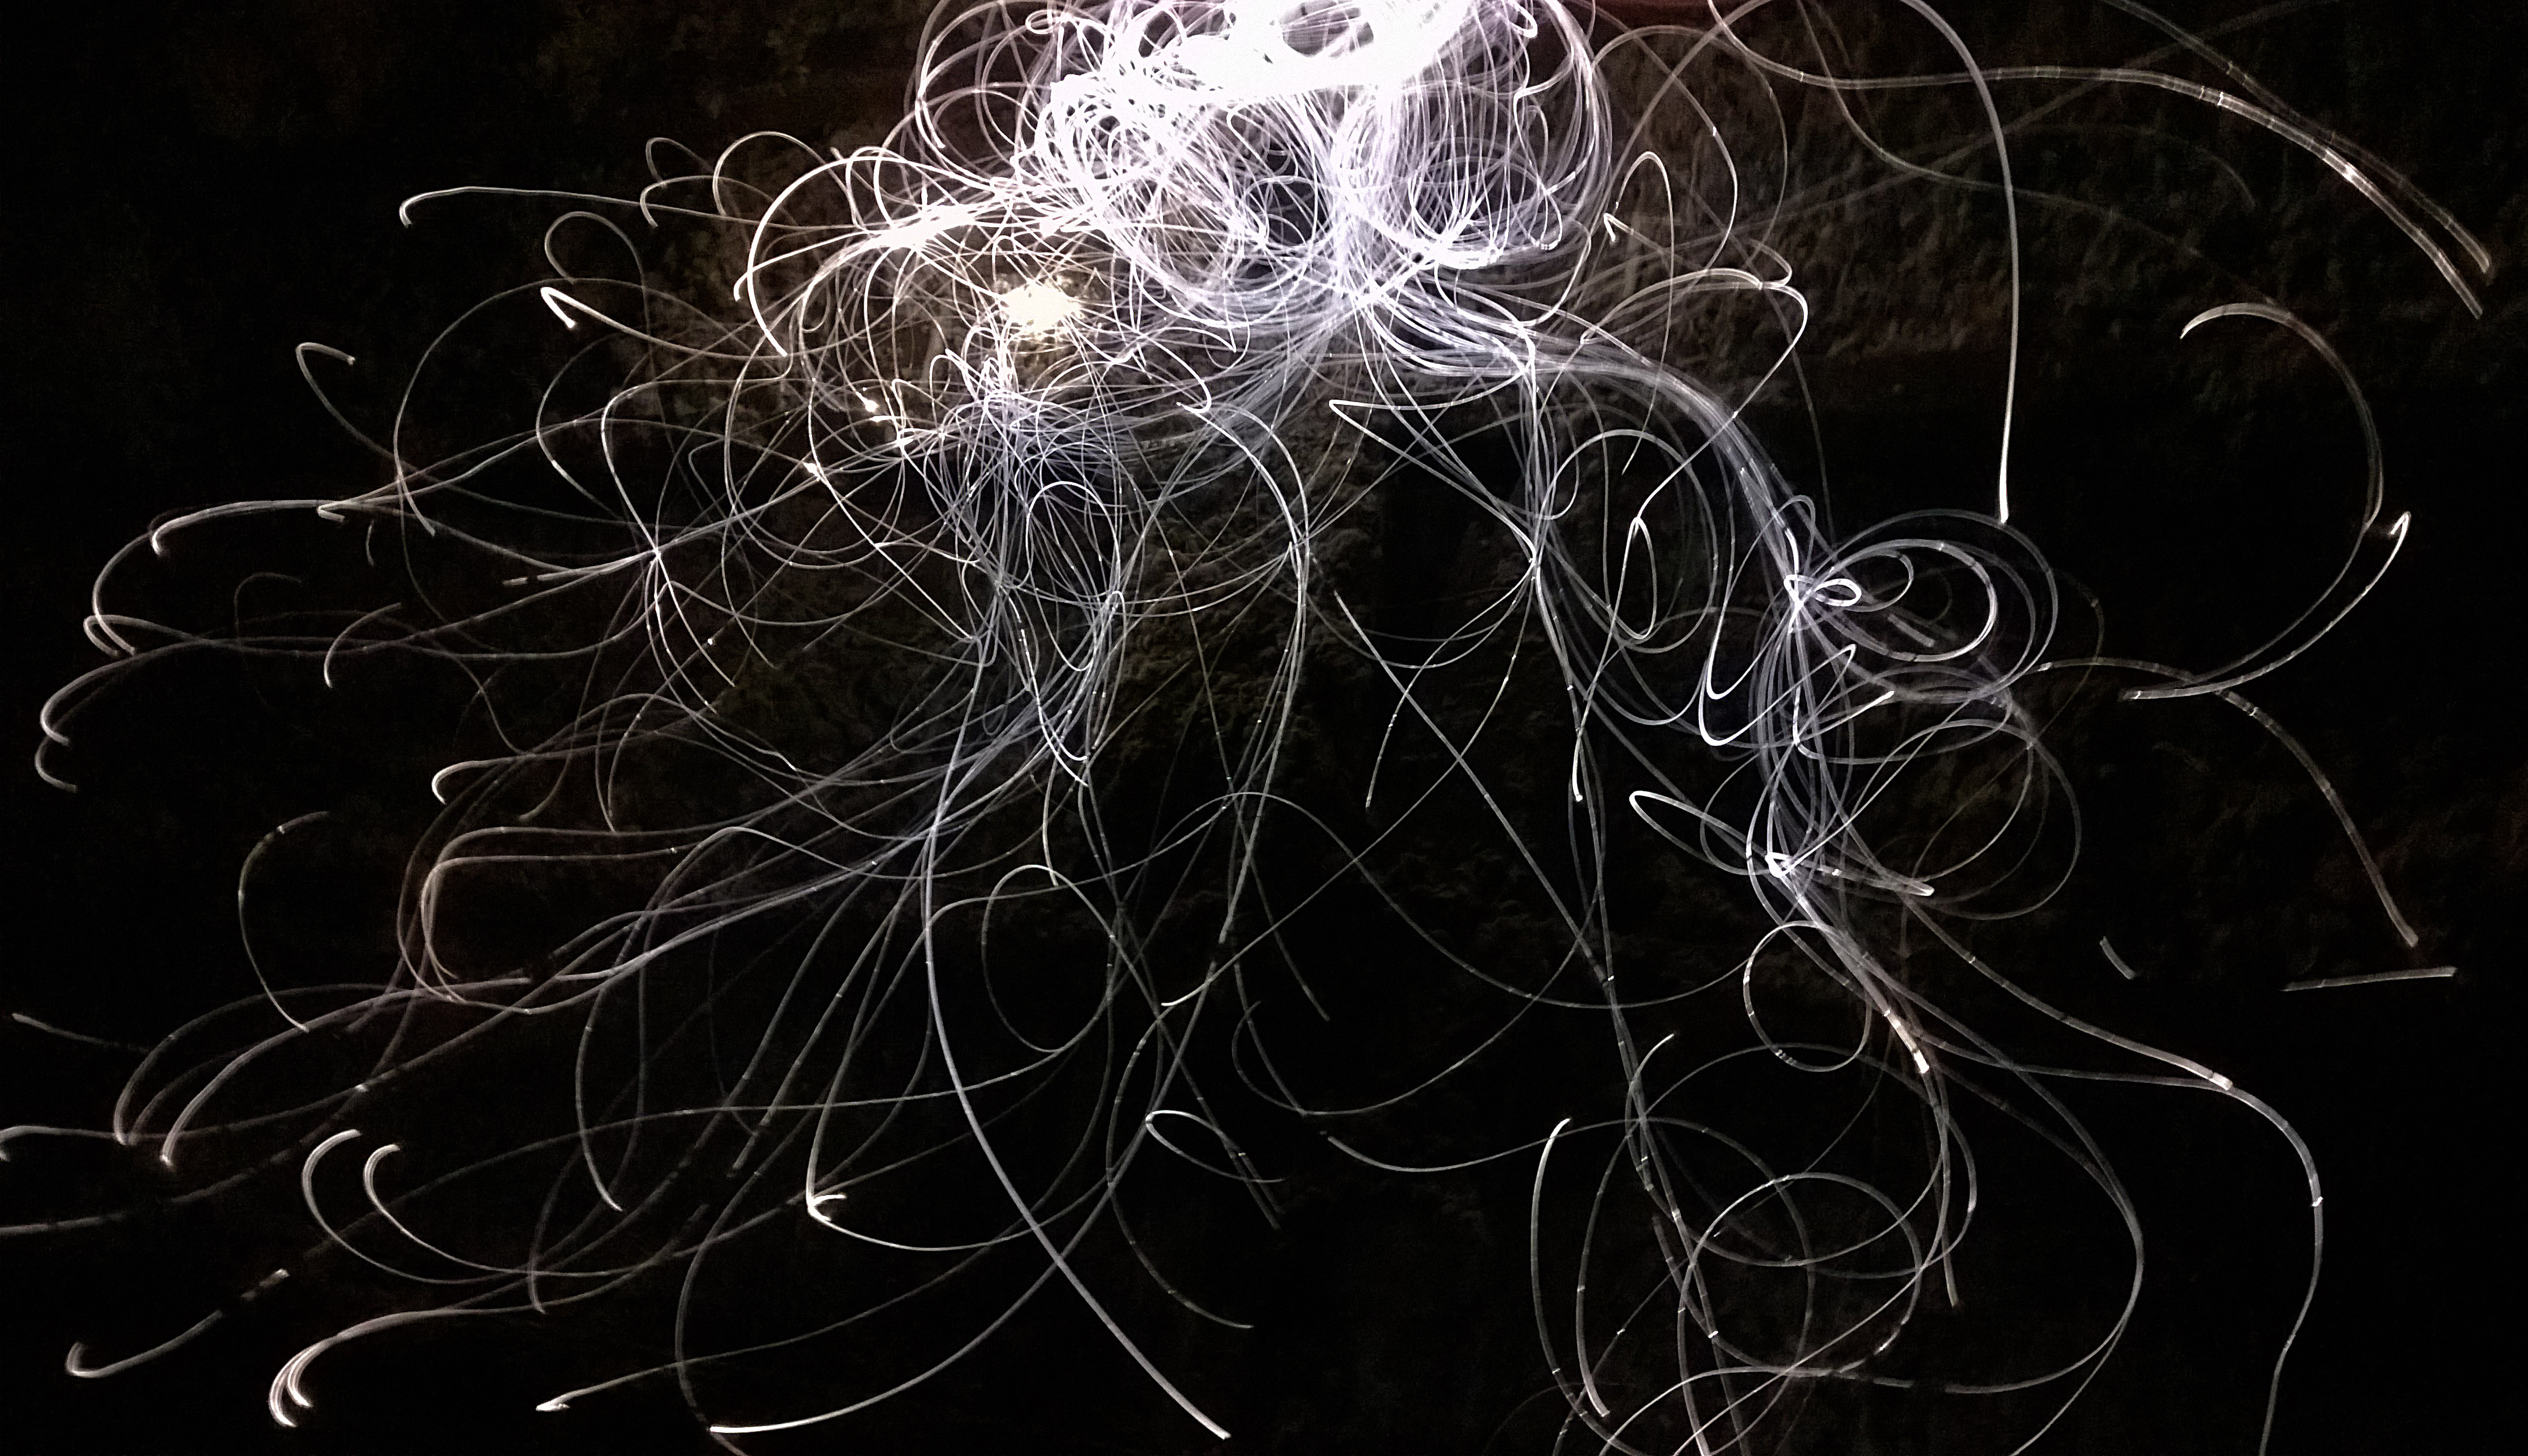
Once you’re done running the fiber optic cabling you’ll end up with some trippy, glowing, alien grass growing out of your ceiling, don’t trim it just yet.
Now it’s time to patch and paint over any holes you didn’t use and any other ceiling damage that occurred during the install. It’s important to do this before you trim the cables so that you don’t paint or patch over any illuminated ends. Once you’re done patching and painting you can use flush cut pliers, or even nail clippers, to trim the fiber optic cable flush with the ceiling. After a couple of days and you’re confident there’s nothing left to do in the attic as far as corrections or the like, you can replace any insulation and pat yourself on the back.


The photos do not do this creation justice. I had a chance to see it live and for the first time in my life I had my picture taken with someone’s ceiling. ( think tourist in wax museum style). Amazing.
the baby is going to love this, though I’m wondering if you should use it daily or just save it for special occasions?